
Perk up your ears. We have some useful tips!
WordPress is a very powerful CMS (Content Management System) that comes with a plethora of bells and whistles. You probably use a fraction of the WordPress features available but keeping a few handy tips in your arsenal will save you time and increase your productivity.
1. Customize Your Dashboard
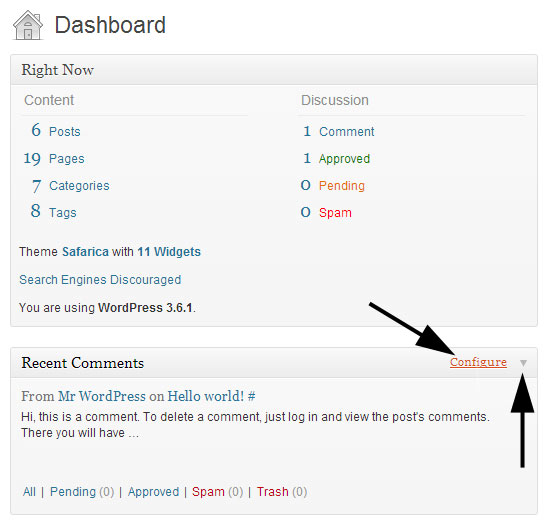 The first screen you see once logged in to WordPress is the Dashboard. By default the dashboard will display a number of modules (“Right Now,” “Recent Comments,” etc.) that summarize what’s happening on your website and the WordPress world.
Some of these modules might not be of interest to you and others might be very important. You can close any dashboard module by toggling the small down-arrow in the top right corner of the module. (You need to hover your cursor over the module title bar.) Some modules allow you to set display options by toggling the “Configure” link next to the arrow.
When hovering over the title bar you will also see a “move” icon which you can use to drag the module to your desired area of the dashboard. Your personalized dashboard will be saved to your account; other users accessing the dashboard will see “their” dashboard.
The next tip gives you even greater control….
2. Manage Your Screen Options
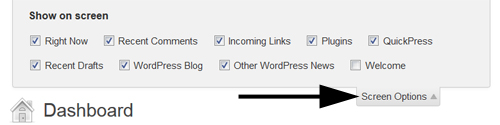 At the top right of the dashboard is a Screen Options tab. Click on the tab and select the modules you wish to see on that particular screen. If you are on the Dashboard your screen options will include modules applicable to the Dashboard, such as “Right Now.”
Screen options vary depending on the type of page you are editing. Screen options for a post will include “Author, “Slug,” “Discussion,” “Tags,” etc. Select which screen options you want and close the screen options section. Your changes are saved automatically.
3. View Revisions
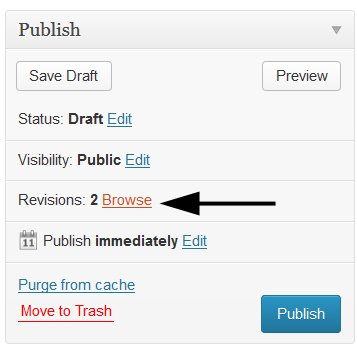 Have you ever royally screwed up an existing WordPress page and wish you could go back in time? You can! Each time you click Update or Save Draft, WordPress saves a copy of your work. Up to 25 revisions are available for you to browse and restore.
Revisions are found in the Publish module in the top right corner of a page or post. Click on “Browse” and you will see the current revision on the right and the previous revision on the left. Use the “previous” and “next” buttons, or the scroll bar at the top, to navigate through the revisions. As two revisions are displayed side by side, text additions are highlighted in green and deletions are in red. Find the revision you want to restore and click “Restore This Revision.”
4. Everything But the Kitchen Sink

Can’t find an editor tool you KNOW was there? “I just used the underline tool yesterday!” You are not losing your mind. Chances are the second row of editor tools is hidden. Click on the “kitchen sink” button and all of your available tools will display.
5. Keyboard Shortcuts
Time to increase your productivity by using keyboard shortcuts.
Select All: If you need to select all the text in a field or content box, place your cursor anywhere in the area and click CTRL-A. (CMD-A on Mac.) Now everything is selected.
Copy: Have everything selected? Click CTRL-C to copy the selected text. (CMD-C on Mac.)
Paste: To paste your copied text, click CTRL-V. If you are replacing one piece of text for a new selection, you don’t have to delete the existing text first. After copying the text you wish to use, select the text you need to replace and then click CTRL-V. Your recently copied text will be pasted over the selected text. (CMD-V on Mac.)
OOPS: Made a mistake? CTRL – Z will take you back a step. Click CTRL-Z again to go back another step. (CMD-Z on Mac.)
Single Line Break: Using the ENTER key gives you a full break and results in a new paragraph. Need to go down just one line? SHIFT+ENTER will position your cursor down one line.
Change Styling: Instead of clicking on the editor menu to select a style and apply to your text use the following shortcuts: (Mac uses “Command + letter”)
Ctrl + b = Bold
Ctrl + i = Italic
Ctrl + u = Underline
Ctl + k = insert link into post – NEW Inline Insert!
Shift + Alt + 1 = Heading 1
Shift + Alt + 2 = Heading 2
Shift + Alt + 3 = Heading 3
Shift + Alt + 4 = Heading 4
Shift + Alt + 5 = Heading 5
Shift + Alt + 6 = Heading 6
6. Preview Opens in a New Tab
I get a lot of questions about this, and to be honest, I learned this one the hard way – losing all of my page edits while fearing I was losing my mind.
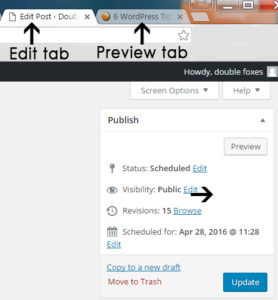 Simply put, when you click the “Preview” button in the top right of the page you are editing, a new preview page will open in a different tab. When you click on that tab to view the changes, unless you have saved your changes, you are only viewing the pending changes. (If you have saved your changes you don’t need to use Preview, you can just View the page.)
Sometimes at this point you may need to make more changes and instead of going back to the original page you click “edit” on the preview page. Guess what? You won’t see the changes you just made because you aren’t on the page you were editing. If you continue this process, you will soon be using four letter words and threatening to heave your computer out the window.

So think of preview as just a quick rendering of what the page will look like after you have saved the original page.
Okay, you can relax your ears now.